Using kivy for Python user interfaces

No. 16
Kivy is an open-source, cross-platform user-interface library that you can run on Linux, Windows, Android and iOS, as well as the Raspberry PI home computer kit. Under the covers it uses the OpenGL graphics library, including GPU acceleration. It also has advanced interfaces for multi-touch user gestures.
But the main attraction to many programmers is that Kivy programs can be compiled to run on mobile devices using Android and iOS as well as for MacOS and Windows.
Installing Kivy should be as simple as using the usual pip (Python installer program), but all attempts we made on Windows 10 failed because of a missing or corrupt PEP file. However, you can install Kivy using the Anaconda command:
conda install kivy -c conda-forgeThis worked fine, but if you want to find the useful Kivy example programs they are buried in
C:\Users\your_id\anaconda3\pkgs\kivy-2.0.0-py38h7600b87_1\info\test\examplesIn this first article, we’ll show you how easy it is to create a graphical calculator interface, with very little code. We wrote the app in a couple of hours, but we had already gained some Kivy experience building another app we’ll discuss next week. So, here is a screenshot of the calculator app we built:
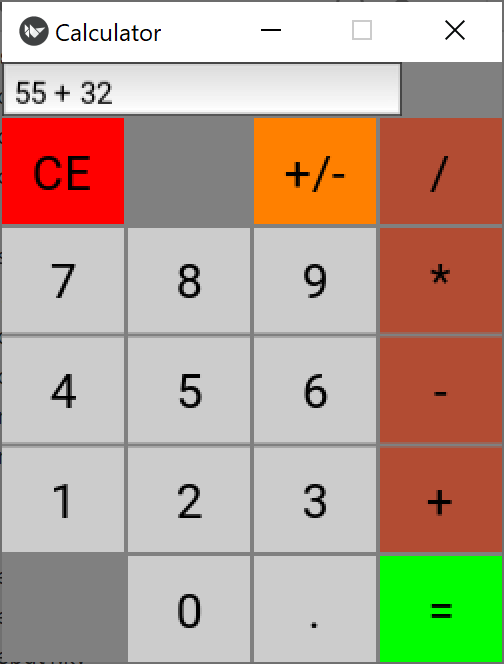
We were able to build this app quite quickly in part, because we had already written one for tkinter and was able to reuse some of the ideas. For example, all of the grey keys all use the same click event to copy the key label into the text input field at the top. This also applies to the brown math function keys, since rather than parsing the data, we decided to simply use Python’s calc function to evaluate the expression.
The Kivy design language
Often, you can write nearly the whole program as a series of Kivy descriptors in a Kivy language file. These simple files describe what the layout is and where each of the widget go. They also describe the click events that each button executes. This is the real power of Kivy.
So a Kivy program consists of a short Python program (calc.py) and a simple Kivy descriptor file (calc.kv). Here is part of the top of that file:
  # this is where the calculation is shown
    TextInput:
		id: calctext
		size_hint: (.8, .1)

    # The grid contains all the buttons
	GridLayout:
	    cols: 4
	    spacing: [2,2]

	 # top row
	    RedButton:
	        text:'CE'
	        on_press:
	            app.clearEntry()

	    DarkGrayButton:
	        text: ''

	    OrangeButton:
	        text: '+/-'
	        on_press:
	            app.chgSign() #changes the sign
	    BrownButton:
	        text:' / '
This describes the first two lines of the calculator display: the TextInput field and the top line of the 4 column grid, containing ‘CE’, ‘’, ‘ +/- ‘ and ‘ / ‘. The dark gray button is just a spacer that fills out the row and has num function. In our original design, there was a CE button and a C button for Clear and Clear Entry, but we eliminate the stack parsing and instead delegated that to the eval function instead.
Now Kivy doesn’t really have symbols for all these different colored buttons. We actually derive them as little subclasses from a base button class, where we define the shape and border of the base button, noting that it is derived from the Button: class.
# basic button class
<BaseButton@Button>
    color: 0,0,0,1
    font_size: 24
    background_normal: ''
    padding_horizontal: 20
    size_hint: (0.1,0.05)
Then, our gray button is derived from the BaseButton like this:
# Gray button class calls numClick
<GrayButton@BaseButton>:
    background_color: .8,.8,.8,1
    on_press:
        app.numClick(self.text)
Colors in the Kivy descriptor file are decimal numbers between 0 and 1 for each of R, G and B, and the fourth number represents the color’s transparency (1 is none).
The other important thing is that the GrayButton click calls the Python program’s numClick(self.text) method, which passes that key’s number in the val argument and adds it to the text input field. We can get the brown buttons to do the same, by deriving the BrownButton class from the GrayButton class. Then it too will add its characters to the TextInput:
<BrownButton@GrayButton>
     background_color: .7, 0.3,0.2
Here’s what happens in our Python program:
class MainApp(App):
	def build(self):
		self.title = "Calculator"
		Window.size = (250, 300)
		self.load_kv('calc.kv')
	def getEntry(self):
		return self.root.ids.calctext.text
	def setEntry(self, val):
		self.root.ids.calctext.text = val
	def numClick(self, val):
		cString = self.getEntry()
		self.setEntry(cString + val)
The Python program gets the current text from the text field, appends the new character to it and puts in back into the text field. This happens for both the numbers and the math operators.
The equals sign green button calls calcClick():
<GreenButton@BaseButton>
     background_color: 0,1,0,1
     on_press:
         app.calcClick()
In the Python program we evaluate the expression and put that new value into the text field. Note, however, that illegal characters will cause an exception, which instead puts a “Syntax error” message in the field instead:
# calculate the result of the expression
# in the text field
def calcClick(self):
    try:
	cString = self.getEntry()
	result = eval(cString)
    except:
	self.setEntry("Syntax error")
    else:
	self.setEntry(str(result))
The RedButton just sets the text field to empty:
RedButton:
     text:'CE'
     on_press:
         app.clearEntry()
Where the corresponding Python is
def clearEntry(self):
    self.root.ids.calctext.text = ""
That’s most of the program. We’ll go over all the details of setting up these files in the next article, but the main point is that writing these descriptors is very easy, and the Python they call is pretty obvious.
Since this program uses the eval function, it will correctly evaluate priorities, such that multiplication and division are performed before addition and subtraction. There is no way to evaluate parenthetical expressions, but as an exercise, you could use the two empty buttons to generate left and right parens.
Comparing with tkinter
By comparison, this is the same program written in tkinter.
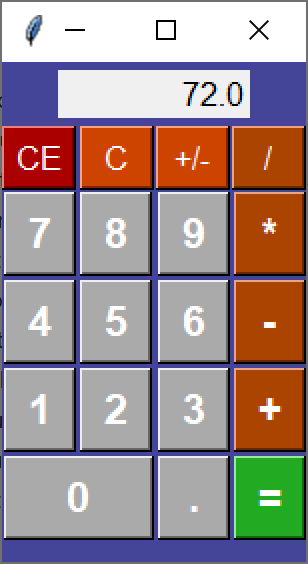
Note that the buttons and spacing look much more professional than the simplistic ones that Kivy provides. Also, note that we were able to combine two grid cells together for the zero key in tkinter. This is not possible in the Kivy Gridlayout.
Meanwhile the code for both is on our Github site:
All code can be downloaded from GitHub under jameswcooper/newsletter.
Subscribe to this newsletter so you don’t miss a single Monday’s issue!